
Have you ever wanted to plant potatoes in your garden but a. didn't have enough room, b. figured your soil was too hard and compact to allow for proper growth of potatoes or c. just weren't sure how to even go about doing it. Well if any of these or other reasons apply then this post is for you.
 Potatoes are a great thing to know how to grow in your garden. We can and probably do use them quite often in most of our everyday cooking whether it be in soups, breakfast casseroles or skillets, fries, or just good old baked potatoes. So, why not try your hand at growing your own!
This post will teach you how to grow potatoes in a bucket. One of the great advantages to growing them in a bucket is that you can bring them in your garage or other cold storage space over the winter and keep them "fresh" for use during the winter months. What types of potatoes can you grow in a bucket? Any kind you want including sweet potatoes. So let's get started.
The list of things you will need:
5 gallon bucket/bag about 12-16 in. in diameter
gravel
compost/rich gardening soil
seed potatoes
Get your seed potatoes.What is a seed potato? Basically a potato that has sprouted or grown"eyes". You can get these from some nurseries they might have a bucket or tub full of them somewhere. You can also try looking at a grocery store, online from a seed supplier, local farmers market, or just let one of your own potatoes sprout. You can plant a potato with about an inch or so long sprout but it needs to have at least 2 "eyes".

Prepare your bucket. You will need to drill several holes about 1/4" to 1/2" in diameter on the sides toward the bottom of the bucket. Next pour 1-2 inches of gravel in the bottom of the bucket. The gravel helps make sure the bucket drains properly and the holes don't get plugged up. Last put 4"-6" of soil mixture on top of the gravel. The soil can be a combination of your own garden soil, potting soil, compost and inexpensive top soil. Just make sure the combination isn't too hard or stiff if it is just add a little sand to it.
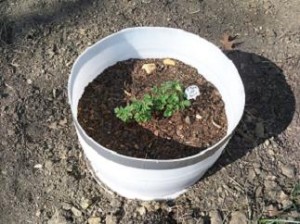
Plant your potatoes. Take your seed potatoes(one to two per bucket) and push them into the soil making sure the sprouts are pointing upwards. Now cover them with another 3-4 inches of soil mixture. If the potato is large with multiple eyes you can cut it in half dividing the potato so there are sprouts on both halves. You can then plant each half separately. One thing to keep in mind is if you do cut it in half – set the cuts in a window sill for 2-3 days to “cure” the cut surfaces – this will help reduce the chance of mold.
Watering the potatoes. It's important to keep the soil moist but not saturated. It's probably best to water them every other day depending on temperature and rain. How do you know if you've given them enough water? As a general rule keep watering until you see some water begin to come out the holes in the bottom then you know they have enough.
Sunlight. Make sure to place your potato buckets in an area where they will get plenty of sunlight. That's the great part about growing them in buckets you can put them anywhere you want just make sure they are getting at least 8 hours of sun a day.
They are growing what next? As the potato plants grow you will need to cover the new growth with more soil to facilitate more growth and potatoes. Once the plant has grown about 4-5 inches above the soil that is when you want to cover it with more soil until only the tips of the leaves are poking out of the soil. Keep doing this until the bucket is full. One other important thing to do, unless you want super tiny potatoes, is to add low-nitrogen fertilizer, usually in early July is the best time to start adding it. Just the one time should be sufficient. Potatoes don't require much fertilizer as long as you've given them a great starting soil.


Pests and Disease. Luckily growing potatoes in buckets will help eliminate most of the problems that potatoes can have but not all of them. Some things to look out for are: Colorado potato beetle, the flea beetle, and the aphid. These pests can be avoided by practicing good planting techniques such as not over/under watering and too little fertilizer. Some diseases to look out for are early or late blight.
Harvesting.When do you know your potatoes are ready to eat? As a general rule when the plant begins to bloom and then die back that is when your potatoes are ready. If you aren't sure you can always reach down and feel inside the bucket for a potato. If it is about the size of an egg or larger then they are ready to harvest. If you want them to grow bigger you can leave them, however once the foliage starts to die back you absolutely need to harvest your potatoes.
Storage. Once you have harvested your potatoes you can do a few things with them including: freezing them or canning them, but if you want to just have fresh potatoes to eat the best thing to do is store them in a cool dry place such as a basement or root cellar. After digging them out, allow the soil to dry, brush it off, and do not wash the tubers until ready to use. You can also store them by keeping them covered in soil which will keep them fresh and prevent the air from getting to them and causing rot.
Other odds and ends. If you have potatoes left over from your harvest and want to try and plant them next spring there are some things to consider. First if you had any problems with them during the growing season such as pest and disease then it will most likely continue into the next season and your following crops won't be as good and you could have more problems. The best thing to do is get new potato seeds from a good reliable source. The only exception to this would be if you know it is a certified heirloom potato seed. You are more likely to have success with this type year after year. Also, some people just use buckets from Home Depot or Lowe's but they aren't considered food grade so if this is a concern for you definitely find food grade buckets to use.
Potatoes are a great thing to know how to grow in your garden. We can and probably do use them quite often in most of our everyday cooking whether it be in soups, breakfast casseroles or skillets, fries, or just good old baked potatoes. So, why not try your hand at growing your own! This post will teach you how to grow potatoes in a bucket. One of the great advantages to growing them in a bucket is that you can bring them in your garage or other cold storage space over the winter and keep them "fresh" for use during the winter months. What types of potatoes can you grow in a bucket? Any kind you want including sweet potatoes. So let's get started.
The list of things you will need:
5 gallon bucket/bag about 12-16 in. in diameter
gravel
compost/rich gardening soil
seed potatoes
Get your seed potatoes.What is a seed potato? Basically a potato that has sprouted or grown"eyes". You can get these from some nurseries they might have a bucket or tub full of them somewhere. You can also try looking at a grocery store, online from a seed supplier, local farmers market, or just let one of your own potatoes sprout. You can plant a potato with about an inch or so long sprout but it needs to have at least 2 "eyes".

Prepare your bucket. You will need to drill several holes about 1/4" to 1/2" in diameter on the sides toward the bottom of the bucket. Next pour 1-2 inches of gravel in the bottom of the bucket. The gravel helps make sure the bucket drains properly and the holes don't get plugged up. Last put 4"-6" of soil mixture on top of the gravel. The soil can be a combination of your own garden soil, potting soil, compost and inexpensive top soil. Just make sure the combination isn't too hard or stiff if it is just add a little sand to it.
Plant your potatoes. Take your seed potatoes(one to two per bucket) and push them into the soil making sure the sprouts are pointing upwards. Now cover them with another 3-4 inches of soil mixture. If the potato is large with multiple eyes you can cut it in half dividing the potato so there are sprouts on both halves. You can then plant each half separately. One thing to keep in mind is if you do cut it in half – set the cuts in a window sill for 2-3 days to “cure” the cut surfaces – this will help reduce the chance of mold.
Watering the potatoes. It's important to keep the soil moist but not saturated. It's probably best to water them every other day depending on temperature and rain. How do you know if you've given them enough water? As a general rule keep watering until you see some water begin to come out the holes in the bottom then you know they have enough.
Sunlight. Make sure to place your potato buckets in an area where they will get plenty of sunlight. That's the great part about growing them in buckets you can put them anywhere you want just make sure they are getting at least 8 hours of sun a day.
They are growing what next? As the potato plants grow you will need to cover the new growth with more soil to facilitate more growth and potatoes. Once the plant has grown about 4-5 inches above the soil that is when you want to cover it with more soil until only the tips of the leaves are poking out of the soil. Keep doing this until the bucket is full. One other important thing to do, unless you want super tiny potatoes, is to add low-nitrogen fertilizer, usually in early July is the best time to start adding it. Just the one time should be sufficient. Potatoes don't require much fertilizer as long as you've given them a great starting soil.


Pests and Disease. Luckily growing potatoes in buckets will help eliminate most of the problems that potatoes can have but not all of them. Some things to look out for are: Colorado potato beetle, the flea beetle, and the aphid. These pests can be avoided by practicing good planting techniques such as not over/under watering and too little fertilizer. Some diseases to look out for are early or late blight.
Harvesting.When do you know your potatoes are ready to eat? As a general rule when the plant begins to bloom and then die back that is when your potatoes are ready. If you aren't sure you can always reach down and feel inside the bucket for a potato. If it is about the size of an egg or larger then they are ready to harvest. If you want them to grow bigger you can leave them, however once the foliage starts to die back you absolutely need to harvest your potatoes.
Storage. Once you have harvested your potatoes you can do a few things with them including: freezing them or canning them, but if you want to just have fresh potatoes to eat the best thing to do is store them in a cool dry place such as a basement or root cellar. After digging them out, allow the soil to dry, brush it off, and do not wash the tubers until ready to use. You can also store them by keeping them covered in soil which will keep them fresh and prevent the air from getting to them and causing rot.
Other odds and ends. If you have potatoes left over from your harvest and want to try and plant them next spring there are some things to consider. First if you had any problems with them during the growing season such as pest and disease then it will most likely continue into the next season and your following crops won't be as good and you could have more problems. The best thing to do is get new potato seeds from a good reliable source. The only exception to this would be if you know it is a certified heirloom potato seed. You are more likely to have success with this type year after year. Also, some people just use buckets from Home Depot or Lowe's but they aren't considered food grade so if this is a concern for you definitely find food grade buckets to use.
Comments
Post a Comment